

Images are one of the simplest ways to inject personality into your blog. No matter what theme you’re using, you can add life with images — insert them into posts and pages, use them for headers and backgrounds, or liven up your sidebar with image widgets.
Today, we’re exploring the latter, as our tour of your widget options focuses on all things image: image widgets, Flickr and Instagram widgets, Gallery widgets, and Gravatar and Author widgets.
Image widgets

An image widget is just what it sounds like: a widget that displays an image along with a title, if you choose to give it one. They look something like what you see to the left. (Don’t worry if you’d like to use them for something other than proclaiming your love for WordPress. We won’t be hurt.)
Need inspiration? Check out how music mag Beatroute uses them to highlight recommended albums and local music events, or how illustrator Sara Goodreau adds custom social networking icons. For more, take a look at our tutorial.
To create an image widget, you’ll need the URL of the image you want to use — that is, the image will need to be uploaded to the internet, whether that’s through your Media Manager, a Flickr account, or elsewhere. To find the URL of an image you’ve uploaded through WordPress.com, head to your Media Manager and click “Edit” under the image you want. (Other image-hosting sites will work differently, although the URL and image embedding options are often called something like “Share.”)
Once you’ve got the URL, head to the Widgets tab in your dashboard, drag an image widget to the sidebar, paste in the URL, and add a title if you’d like. There are also a few other settings you can customize, like the caption. You can also leave these blank and your widget will display just fine.
When you’ve got everything set, click “save.” You’re done!
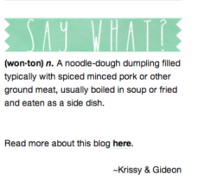 If you’re feeling especially saucy, you can also use images in text widgets. Insert an image into a text widget using HTML, and add text and links to create a completely custom widget — the sky’s the limit. Take a look at how Wild Wonton used an image to create a custom widget header:
(Interested? Here’s a tutorial.)
Flickr and Instagram widgets
Display your photography in your blog’s sidebar without creating a new image widget for every photo — activate the Flickr or Instagram widgets to automatically queue up your latest shots. Since the widget updates as you add new images, your sidebar stays fresh:

Your readers will be able to click the images to see them full-size on your Flickr or Instagram pages.
To use the Flickr widget, you’ll need the URL of your Flickr’s RSS feed (don’t worry — it’s easy to find, even if you have no idea what that means). Head to your Flickr Photostream and click the “Edit” tab. Then, scroll to the bottom of the screen until you see a small orange RSS icon. Right-click on the icon and choose “Copy this link address.” This is what you’ll paste into the widget settings. It should look something like:
http: //api.flickr.com/services/feeds/photos_public.gne?id=xxxxxxxxx&lang=en-us&format=rss_200
For the Instagram widget, you’ll just need to give WordPress.com permission to connect to your Instagram account. We’ll ask you to do this when you first configure the widget — click “authorize” to okay the connection. (We promise to use this power only for good.)

Once you’ve done the basic set-up, there are a few other things to tweak. Give your widget a title, and choose how many photos you’d like it to display. Hit save, and you’re done (again)!
Gallery widgets
If you want a little more control of which of your photos appear in the sidebar, use the Gallery widget. It lets you create either a gallery or slideshow of your shots right in the sidebar. The widget supports all the same tiled-gallery layouts as full-size galleries, so it’s a fun way to add a graphic element to your sidebar without any graphic design know-how.
To set up a gallery, give it a title and then click “Choose Images” — this widget uses images you’ve uploaded to your Media Manager, so either select the ones you’d like to display, or upload them now. Choose the gallery style you prefer and choose where you’d like the images to link (send readers to an image attachment page or have clicks open a full-size carousel).
 Voila: gallery! (This example uses the “Tiled” layout.)
You can have multiple Gallery widgets in a sidebar — use them to display different sets of photos around the different themes you blog about to create a sidebar that’s uniquely you.
Gravatar and Author widgets
You can use Image, Instagram/Flickr, and Gallery widgets to add more “you” to your sidebar… or you can use the Gravatar or Author widgets to add some literal you. Use these widgets to help your readers put faces to their favorite bloggers.
![]() The Gravatar widget shows your Gravatar (duh) along with whatever text you choose to include. Use HTML to add links to other sites where you’re active and use the widget as a mini-resume, or just keep it simple with the pic and a one-liner, as I’ve done.
The Gravatar widget shows your Gravatar (duh) along with whatever text you choose to include. Use HTML to add links to other sites where you’re active and use the widget as a mini-resume, or just keep it simple with the pic and a one-liner, as I’ve done.
What if you work on a blog with multiple authors and don’t want a sidebar full of individuals Gravatars? You’ve got options: use the Authors or Author Grid widgets to show off your writers. The Author Grid will display the Gravatars of all a blog’s authors in a square gallery style, while the Author widget adds a list of each author’s recent posts. Customize the sizes of the photos and number of posts listed to build an widget that fits your layout, the way Nursing Clio has.
Images engage readers and enhance content, and all the widget options make it simple to liven up your sidebar. Activate any of these widgets today by going to Appearance >> Widgets in your dashboard!
Like this? You might also be interested in:

I think the single most useful widget is “Archives”. If I visit a blog with an unfamiliar theme or an odd setup archives will always work the same way and allow me go get around quickly.
This is great info. I am new to blogging and it was very helpful to read this. Thank you.
why can’t I add more share buttons
Laurinda, what kinds of sharing buttons do you want to add, and where?
Thank you! I am still trying to figure this stuff out.
The widgets are pretty useful, I use a simple gallery one to display a collection of images on my page, it really adds a splash of colour and activity to a page which is rather nice. Would be nice to have a follow up article on some of the other widgets.
Hi, Ben! Take a look at the links at the end of the post — we’ve published several other widget overviews/tutorials. We’ll also be publishing more in this series, so keep an eye ou!
Ah many thanks, I didn’t see the links first time round.
You’re very welcome!
I’m having trouble with the Twitter timeline widget….Just doesn’t want to work
Thank you WordPress! Great tips for bloggin’
Great info now to wrap my brain around it and figure it out and apply it . Lol. Not tech savy!!!
I love the gallery widget. On one of my blogs (imprompt.wordpress.com/ ) I have one set so that each photo links to a writing prompt. Very compact way of offering links. And pretty, too.
If you find that you cannot link to your favourite post with a simple text (WP did allow this simple feature at the beginning), you can instead use image to do the trick (such as on MY OPEN LETTER To WORDPRESS to check my support issue at WordPress forum) as a workaround.
Thanks for the great post. Am still learning and enjoying every bit.
Can you post the step by step buttons to click for the instagram widget?
Sure thing! Here you go: https://wordpress.com/support/widgets/instagram-widget/
thanks 🙂
Id really like to know how you link from photos in a gallery to pages or posts. For me, the links seem to disappear… It just does not work! 😦
When you create a gallery, the options for individual images are to link to (1) the attachment page or (2) the media file (the original, full-size version of the image).
Thanks heaps! I’ve learnt something new today. Just wondering if by displaying images using gallery widget can the the related post topic hover over the image like it does for Top posts & pages? Can wordpress enable that?
It’s not something you can currently do, but feel free to suggest it over in the “Ideas” section of the support forums!
https://wordpress.com/forums/forum/ideas
Widgets are great. The Text widget accepts HTML so you can do pretty much anything you like. You just have to keep in mind the size. Here is one interesting way to use the Text widget to define the shape and appearance of links: http://45southcafe.wordpress.com/
Thank you so much! My blog is soooooo blahg so will need to work on that!
Thanks for this article. Great tips!
Gallery widget seems perfect. Amazing tips. Thanks for the article
Done, it is easy to configure gallery.
Thanks! 😀