

There are more than 200 themes to choose from in the Theme Showcase: themes with sleek magazine-style front pages (like Oxygen and Watson), static business and profile sites (like Forefront and Profile), and portfolio designs (like Gridspace).
Within this mix are free themes that act as blank canvases for your blogs — ones you can use right out of the box, yet also transform dramatically.
You recognize Coraline, right?

Coraline is a tried-and-true theme — at the time of this writing, 463,641 blogs are using it! So you can imagine, with so many customization options both free and paid, how many versions of Coraline you’ll stumble upon in the wild. These three sites wear Coraline well — at a glance, you can see how distinct they are. Below, we’ll talk about how each site has made this theme their own.

LA Graphic Design

LA Graphic Design, a design studio in Copenhagen, Denmark, provides graphic design and art and visual direction to arts, culture, fashion, and media clients. On their blog of the same name, LA Graphic Design, the studio collects images and snippets of inspiration in fashion, design, and art. The design is clean and minimal, leaving room for images to shine.
As with many themes, you can upload your own header image on Coraline. (On this theme, the suggested width and height for the header image is 990×180 pixels.) Their header is made up of images from earlier posts and resembles a collage of fashion magazine page cut-outs. It easily transforms the front page:

If you don’t want to upload a header image, you can simply change the header text color or remove header text completely under Appearance → Header.
Extremely versatile, Coraline supports up to three columns and has six different layouts to choose from: you can choose a left or right sidebar, left and right sidebars, varied layouts within sidebars, and a full width template (no sidebars). In addition to its sidebar areas, Coraline also supports four widget areas in the footer (or bottom) of your site.

LA Graphic Design opts for a simple and elegant approach: a right sidebar with a few widgets, from the Text Widget at the top for their company description, to the Links, Follow Blog, Categories, and Archives Widgets.
With custom CSS (using the Custom Design upgrade), they’ve made tweaks to unify the site with Georgia font and black link text to create a simple, sophisticated look, much like the fashions and designs they blog about. “We didn’t want a ‘designed’ look at all,” says the studio, but rather a theme acting as an “invisible structure.” Their site illustrates that customization doesn’t necessarily mean piling on extra features — you can customize by paring down, too.
Little Wolf

Portland-based artist and illustrator Maryanna Hoggatt charms us with her colorful and lively blog, Little Wolf — a space where she not only shares her latest creations, but successfully conveys her overall design aesthetic, personality, and body of work.
 How does she do this? On Little Wolf, she takes advantage of Coraline‘s primary and secondary widget areas and has a three-column design with custom Image Widgets along both sides of her main content area. She creates a unified look with custom-scripted links to her portfolio, Twitter, and Facebook.
Like LA Graphic Design, Maryanna uploads her own header image to make her home page pop:

![]() She also dresses up her sidebars with other original icons and fun designs, including an illustrated wolf near the top right that leads to a site showcasing her illustrated series, Animal Battle, as well as linked images to her work on Etsy and Society6.
She also dresses up her sidebars with other original icons and fun designs, including an illustrated wolf near the top right that leads to a site showcasing her illustrated series, Animal Battle, as well as linked images to her work on Etsy and Society6.
In Appearance → Theme Options, you can set a color scheme. Coraline offers seven schemes: white, black, blue, brown, pink, purple, and red. But you can also upload your own background image or set a different color (using the color wheel or inserting a color code) in Appearance → Background. Maryanna opts for a white background and lets her illustrations add the splashes of color.
With the Custom Design upgrade, Maryanna has even more control over elements like fonts, colors, and CSS. Her font choices — Calluna and Le Monde Journal — are delicate with a touch of whimsy, complementing her fantastic drawings of furry creatures.
The Finch and Pea

Our final example proves that Coraline is a flexible theme for any type of blogger or organization — and truly a blank slate. The Finch and Pea, founded by Josh Witten and Michael White, is a blog on all things science and nature, with multiple contributors.
 You probably can’t tell it’s Coraline underneath that dark wood-inspired background and customized facade! In Appearance → Background, they’ve uploaded this dark background image, and activated multiple sidebar areas on the right under Appearance → Theme Options.
For the “Notice Board,” which offers descriptions of the site’s writers, they use a Text Widget. They’ve also activated multiple Twitter Widgets to display tweets from contributors, which is a simple way to show multiple conversations about the topics in which they’re interested.
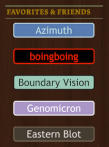 Under “Favorites & Friends,” they’ve created a list of individual button-like images, which link to their favorite sites. It’s an easy way to show a list of links visually, and helps to create a cohesive design as well.
Like the other examples above, The Finch and Pea also has the Custom Design upgrade on their blog to make further tweaks: they use the very distinctive Lapture font for the site title and headings and unify the site with olive green area dividers and gold widget titles, which match the shades of their header text. To round out the palette, they use a cream shade for their body text and a dusky blue link text to add light and cool shades into the mix.
Inspired now? Experiment on your own site. Head over to Appearance → Customize to upload your own header, pick out color palettes and fonts, or tinker with the CSS.
You might also enjoy these earlier posts in the Customizing series:
- One Theme, Three Ways: Customizing iTheme2
- Customizing Imbalance 2: The Patterned Plate
- Customizing Modularity Lite: Girls of Summer
- Customizing Koi: 129 Twig and Vine
- Customizing Comet: Beau and Arrow Events
- Customizing Sight: distraction no. 99
- Customizing Forever: Prada for Breakfast
- Customizing Bueno: Mi Piace Kate
- Customizing Oxygen: BeatRoute Magazine

I am looking for a theme with a panoramic header that encompasses the entire page. Recommendations? Suggestions?
Examples of themes with wide custom headers: Untitled, Book Lite, Wire, Scrollider Express, Profile… There are more, but those are some that come to mind (a few of these listed are paid/premium).
For a broader search, you can search for themes that support custom headers, and browse that way.
I love how varied they are in their interpretation of the theme.
I love this theme on the photo!!!
I love Coraline, I use it for my http://www.quirkybooks.wordpress.com writing blog. My followers seem to enjoy the layout too.
great showcase of how one theme can create multiple look. allow users to customise and differentiate their blog design. will use this theme for my next blog design change.
Interesting and informative
Nice.
Thanks for this post!
So far…I’m happy my my theme. You should check it out!
Let me know what you think. I’d be interested in hearing what you think.
Like the creativity and the way the use of layout is explained. Wish there could be more such blogs on layouts !
Wow, you could not have picked three more varied versions of this theme. I’m amazed at how diverse Coraline is. Thanks for sharing this!
I’ve really liked Coraline, and I know I could be doing a lot more with it. Thanks for this post. It has showed me exactly what I should be getting off my butt to do!
Glad you liked this post and that it was helpful! That’s our hope with these posts — for you to see all the different things you can do.
I really enjoy these Customizing posts. Thanks for sharing!
Having just created my third WordPress blog, for which I’ve used Coraline, I can understand why this theme is so popular. It’s a great theme and was almost exactly what I wanted but this post gives me some ideas for a few tweaks to make it better. Thanks Cheri.
Great to hear, and you’re welcome!
Loved this post! I struggled with Coraline for a few days before switching to something with a less-modern font (Silesia). I may go back and play with Coraline a little! Thanks for posting this.
The Coraline theme looks great in any format – whether it be a simple layout like mine or the more robust looking layouts like the ones featured in your post. Thanks for sharing this information.
There are so many themes like the ones you have to pay for which are really expensive.
Yes, we have a number of premium (paid) themes. Coraline is free. You can sort by “free” in the Theme Showcase, too.
I Mean – is it one of the RTL language support theme ?
I believe our free themes are all supported; you need to change the language settings. Under Settings > General, you need to set the language of your site to the rtl language you want.
No, not all the themes, free or premium, are Rtl theme. In all of them you can write text in any language but the layout is not support RTL content.
I’m told from our theme team that Coraline is supported. And apologies on my inaccuracy — not all free themes are supported (possibly the older ones).
Thank you very much Cheri !
I want to use this theme for my site and have already started testing it. However, I don’t know how to change the size of it. Any ideas?
Hi Roubalita —
Glad to hear you’re testing out this theme — what specifically do you want to update in regard to size?
i love “little wolf” and have been following her blog for a while now! great choice to showcase 🙂
I came here because I thought it had something to do with the movie Coraline… 😉 Oh well, it will be useful none-the-less if I ever choose to move from my stock “Shaan” theme…