Add frame/border to a image
-
Previously I have been able to add and design a frame to pictures I inserted. Now, since a few months back, everything looks different and I can not find the same function.
I could choose the color, line width and appearance, such as solid, dashed, dotted or double. Now I pay for “Advanced Design”, so I do not want to have fewer opportunities than when I had a totally free account.
My theme is “Expound”.
Could that be the problem, that I might have chosen the wrong theme?The blog I need help with is: (visible only to logged in users)
-
Hi there, There have been some recent adjustments to our image editor as discussed here:
If you’d like to add a border to your images to remain consistent with past posts, I’ll give you HTML code you can paste into the editor on your own:
- Open the Post draft where your un-bordered images are installed.
- Click on the Text tab (rather than the Visual tab, which is open by default)
- Underneath the text/code for you first paragraph, you will see the code that represents the first image on your Post. Take a look at that code, and you’ll see where I added the following code to your first image:
style=”margin: 2px; border: 3px solid black;”
I added it directly before src=”http://
- If you click Preview, you will see that this code added your border to the first image on the Post.
- You can return to the Text editor and paste the exact same code before src=”http:// to add borders around the remainder of your images.
- Click Update Draft, Preview, or Publish as needed.
That should do it! If you have any questions at all, please let me know. Many thanks.
-
Thanks so much!
At first I didn’t understand what Text tab you meant, so I opened the image properties and searched there. But after a while it clicked, so now I have my frames again … :D -
-
-
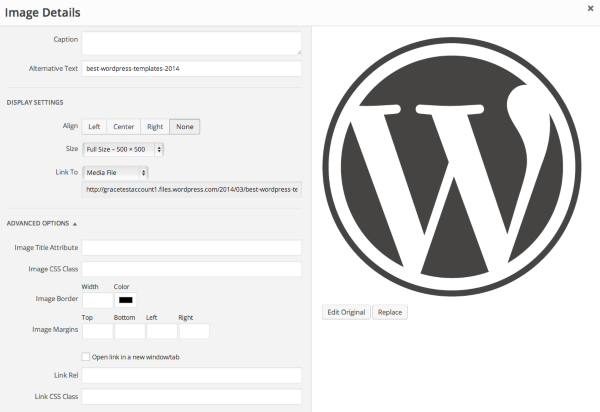
Hi there,
Just an update, I have great news.
Our developers have added border and margin options to the Advanced Options as seen in the screenshot below:
Cheers and Happy Blogging!
-
-
- The topic ‘Add frame/border to a image’ is closed to new replies.
