Are you making the switch from Xanga.com to WordPress.com?
This page explains how to import your blog from Xanga to WordPress.com and set things up just the way you’d like them.
If you don’t already have an account here on WordPress.com, start your site here. This will ensure you have a WordPress.com username and a site address for your Xanga import.
Log into Xanga.com and then navigate to your Xanga Dashboard, which should be located at the following address:
http://xanga.com/wp-admin/index.php
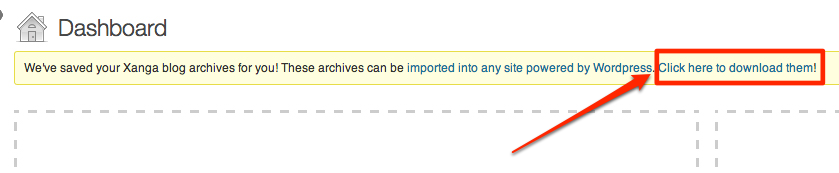
Once there, you will see a page that includes a message about your Xanga archives. It also includes a download link. Click on the link labeled “Click here to download them!”. You should receive a .zip file in your downloads.
Double-click on, or otherwise extract, the .zip file, which should convert to a folder. Inside you should have a few files with the .xml extension.
To bring your Xanga content to WordPress.com, go to your WordPress.com dashboard:
- Click on Tools → Import.
- At the bottom of the list, click Run Importer for Xanga.
- Click on the button Choose File and find the first of your .xml files from Xanga on your computer.
- Once you have chosen the file, click on the button Upload file and import.

There will be a short delay (depending on how much content you have), and then you will see a confirmation of the import. You will then need to do this with each of the import files you received from Xanga.com, which could be three or more separate files.
⚠️
The Importer does not work with Internet Explorer 9.0 or previous versions. Please update your browser or try a different browser, like Firefox or Chrome, if you are having difficulty importing your content.
- Learn about WordPress: Visit your Getting Started page for a tutorial on how to get your site running as quickly as possible.
- Customize your theme and design: You can customize the design of your site by picking one of our post-format-enabled, blog-ready themes.
- Post to your blog by email: To post by email, you need to generate an email address for your blog within your dashboard and then you can get started right away. Our post by email guide will walk you through the process. You can add galleries, tags, videos, slideshows, polls, and so much more, all via email!
- Add video to your WordPress.com site: We support adding videos from a variety of sources, such as YouTube, Vimeo, Ted, Flickr, and many more. Furthermore, you can get the VideoPress feature, included in WordPress.com Premium plans and above to upload your own videos directly to your site.
- Upload or embed other file types: WordPress.com has support for a multitude of file types. Additionally, you can embed documents within your posts as PDFs.
