Once you join WordAds, you can use the information in this guide to review and adjust your ad settings.
After joining WordAds, you will arrive on the settings page with some important settings to review. To find the WordAds settings again:
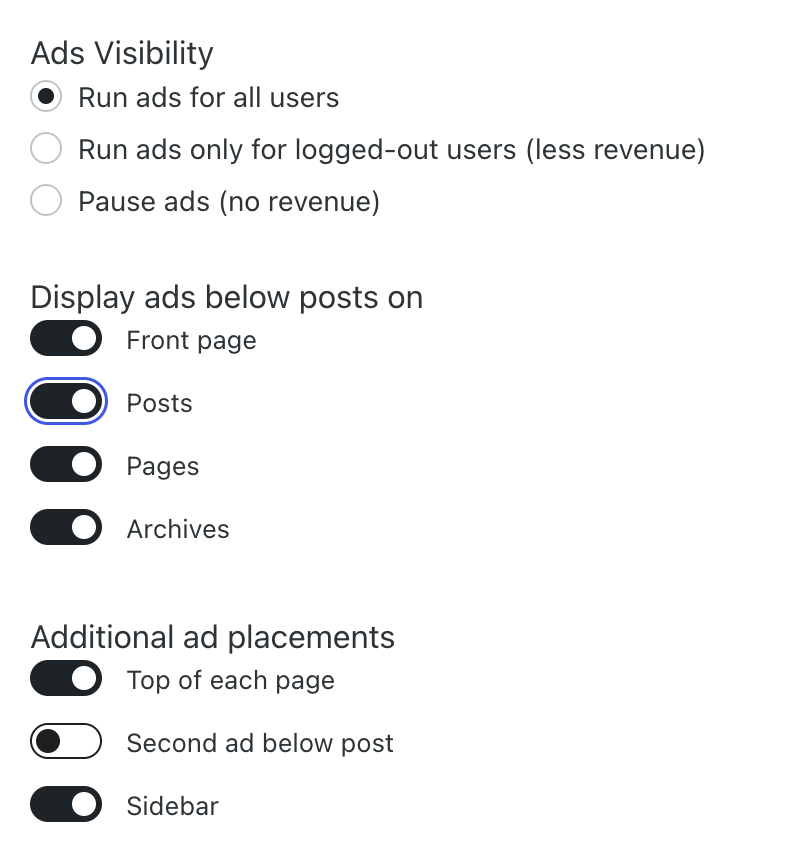
- Visit your site’s dashboard.
- Navigate to Jetpack → Monetize.
- Click the “View Ad Dashboard” button.
- Click the Settings tab.
To start displaying ads on your site, select one of the following options under “Ads Visibility“:
- Run ads for all users
- Run ads only for logged-out users (less revenue)
- Pause ads (no revenue)
If you have a plugin-enabled site, these options will not appear. Instead, enable ads by clicking “Enable ads and display an ad below each post.“
You can then customize where ads are displayed by enabling or disabling ads on the front page (i.e., your site’s homepage), posts, pages, and archives (i.e., category pages, tag pages, and time-based groupings of posts.)
You can optionally place additional ads at the top of each page, a second ad below each post, and on the sidebar (if a sidebar is present in your theme.)
WordAds shares some information about your site’s visitors with our advertising partners. The advertising partners may use that information to display personalized ads to those visitors. To enable this for US-based visitors, toggle on the “Enable targeted advertising to site visitors in all US states” option.
In some US states, site owners are required to offer visitors an opt-out option of having their data used to personalize ads. Therefore, you must:
- Provide a Privacy Policy URL (see our guide on creating a privacy policy.)
- Insert the
[privacy-do-not-sell-link]shortcode into a Shortcode block on your site.
For more information, see our guide on US Privacy Laws and Your WordPress.com Site.
In the box labeled “PayPal Email Address“, type the email address you use for your PayPal account so that you can receive payments for your WordAds earnings. US citizens must also provide a Social Security number to PayPal, as required by the IRS.
Tick the box to indicate that you agree to our Ads Terms of Service. This checkbox is checked by default, indicating your agreement to these terms of service as a prerequisite of your enrollment in the WordAds program.
If you have WordAds enabled, visitors from a country covered by the GDPR will see a CMP (Consent Manager Provider) banner at the bottom of the page informing them of their rights, what data we collect, and the option to consent to the data collection. Visitors can click “View Partners” on this banner to customize their consent options.
Providing consent to visitors is a legal requirement. Therefore, we display the CMP automatically, and it can’t be removed or its text altered.
This CMP banner replaces the Cookie Consent block or Cookies & Consents widget (if you previously added either of these to your site.)

It can take a few hours to several days for ads to begin appearing on your site. Make sure you have enabled ads and selected where you want the ads to appear. Also make sure you have provided a valid PayPal Email Address. Then, allow time for ads to begin to appear on your site.
As the site owner, keep in mind that you may not always see ads when browsing your site. Site owners often visit their own websites many times per day, but advertisers do not want to reach the site owner — they want to reach the website’s visitors. Therefore, it’s common for site owners to see no ads even while ads are visible to other visitors.
