Meta Field Block – Afficher des champs personnalisés dans l’éditeur de blocs sans avoir à coder
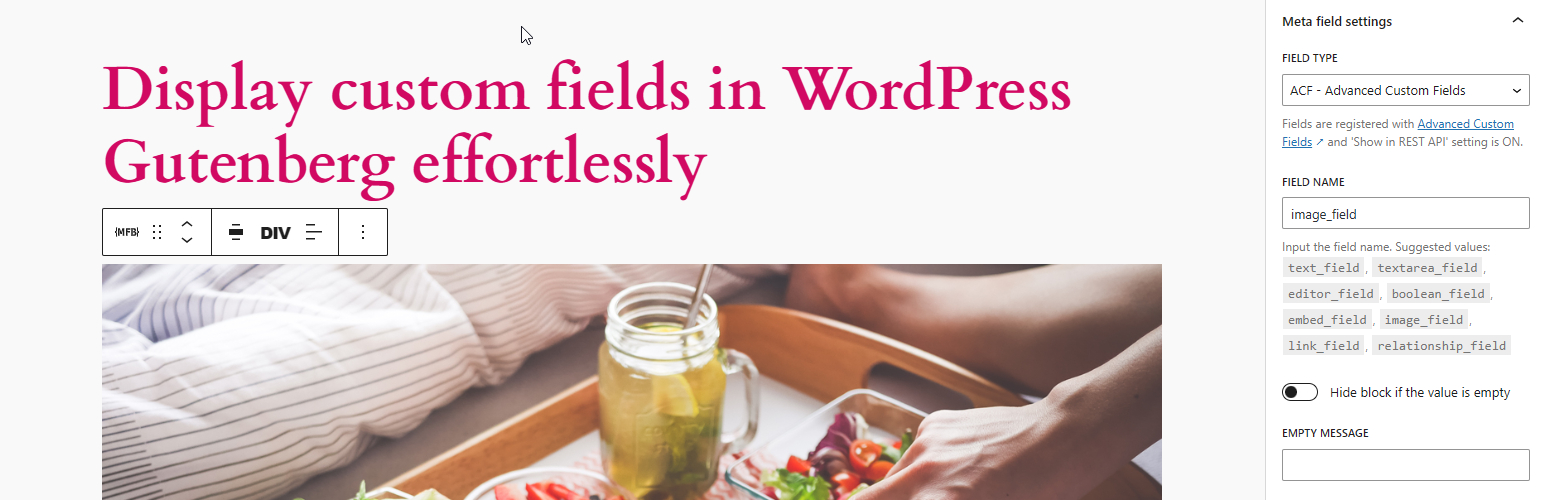
This single-block plugin allows you to display custom fields, shortcode as blocks in the Block Editor. It supports custom fields for posts, terms, and users. It can be nested inside a parent block that has postId and postType context, such as Query Loop, WooCommerce Product Collection, Term Query, or used as a stand-alone block.
Vous pouvez afficher n’importe quel champ dont la valeur peut être récupérée par l’API du cœur (get_post_meta, get_term_meta, get_user_meta) et qui est une chaine de caractères ou peut être converti en chaine de caractères. Pour afficher la valeur du champ dans l’éditeur de blocs, il doit être accessible via l’API REST ou avoir le type de champ défini sur dynamic.
Vous pouvez également afficher explicitement les champs personnalisés créés par les extensions Advanced Custom Fields ou Meta Box. Il prend en charge tous les types de champs ACF et types de champs Meta Box dont les valeurs sont des chaînes de caractères ou peuvent être converties en chaînes de caractères. D’autres champs ACF complexes, tels que les types de champs Image, Lien, Lien vers une page, Vrai/Faux, Case à cocher, Liste déroulante, Bouton radio, Groupe de boutons, Taxonomie, Utilisateur/Utilisatrice, Objet de publication et Relation, ainsi que les champs Meta Box tels que les types de champs Liste déroulante, Case à cocher, Bouton radio, Image, Vidéo, Taxonomie, Utilisateur/Utilisatrice et Publication, sont également pris en charge dans leurs formats de base.
Cette extension fournit également des API de crochet conviviales pour les développeurs/développeuses qui vous permettent de personnaliser facilement la sortie du bloc, d’afficher des champs de type données complexes ou d’utiliser le bloc comme un texte indicatif pour afficher n’importe quel type de contenu avec object_id et object_type en tant que paramètres de contexte.
Un cas particulier où ce bloc est vraiment utile est lorsque vous avez besoin d’obtenir le post_id correct dans votre code court lorsque vous l’utilisez dans une boucle de requête. Dans ce cas, vous pouvez définir le type de champ comme dynamic et entrer votre code court dans le nom du champ. Le bloc l’affichera correctement à la fois sur l’interface publique et dans l’éditeur. Alternativement, si vous voulez uniquement voir l’aperçu de votre code court dans l’éditeur, vous pouvez également utiliser ce bloc comme une meilleure version du core/shortcode.
Pour découvrir rapidement comment ce bloc affiche les champs personnalisés, regardez le petit tutoriel (pour la version 1.3.4 de MFB) réalisé par Paul Charlton de WPTuts. La vidéo porte principalement sur l’extension Advanced Custom Fields, mais vous pouvez utiliser une approche similaire pour afficher des champs provenant d’autres frameworks, comme Meta Box.
Liens
Quel est le résultat HTML d’un champ personnalisé ?
La sortie HTML d’un champ personnalisé sur l’interface publique dépend du contexte du champ. Il utilise l’une de ces fonctions de l’API du cœur pour obtenir la valeur du champ : get_post_meta, get_term_meta, get_user_meta.
Quel code HTML est généré pour les champs ACF ?
-
Tous les types de champs basiques qui renvoient des chaînes ou qui peuvent être convertis en chaînes sont pris en charge – La fonction
get_fieldest utilisée pour générer le code HTML. -
Type Lien – Le code HTML généré est :
<a href={url} target={target} rel="noreferrer noopener">{title}</a>Aucun attribut
reln’est ajouté si l’attributtargetn’est pas égal à_blank -
Type Image – Le code HTML généré provient de la fonction wp_get_attachment_image. La taille de l’image est définie par le réglage « Taille de l’aperçu ».
-
Type Vrai/Faux – Le code HTML généré est
Ouisi la valeur esttrue, etNonsi la valeur estfalse. Voir l’extrait de code ci-dessous pour modifier ces textes :add_filter( 'meta_field_block_true_false_on_text', function ( $on_text, $field_name, $field, $post_id, $value ) { return 'Yep'; }, 10, 5 ); add_filter( 'meta_field_block_true_false_off_text', function ( $off_text, $field_name, $field, $post_id, $value ) { return 'Noop'; }, 10, 5 ); -
Type Case à cocher/Liste déroulante – Le code HTML généré est :
<span class="value-item">{item_value}</span>, <span class="value-item">{item_value}</span>item_valuepeut être égal àvalueoulabelen fonction du format de présentation du champ. Plusieurs valeurs sélectionnées sont séparées par le caractère,(virgule) et l’extrait de code ci-dessous permet de modifier ce séparateur :add_filter( 'meta_field_block_acf_field_choice_item_separator', function ( $separator, $field_name, $field, $post_id, $value ) { return ' | '; }, 10, 5 ); -
Type bouton radio/Groupe de boutons – Le code HTML généré est
valueoulabelen fonction du format de présentation du champ. -
Type Lien vers la page, type Objet de la publication – Le code HTML généré pour un champ à valeur unique est :
<a class="post-link" href={url} rel="bookmark">{title}</a>Pour un champ à valeur multiple :
<ul> <li><a class="post-link" href={url} rel="bookmark">{title}</a></li> <li><a class="post-link" href={url} rel="bookmark">{title}</a></li> </ul> -
Type Relation – Le code HTML généré est :
<ul> <li><a class="post-link" href={url} rel="bookmark">{title}</a></li> <li><a class="post-link" href={url} rel="bookmark">{title}</a></li> </ul> -
Type Taxonomie – Le code HTML généré est :
<ul> <li><a class="term-link" href={term_url}>{term_name}</a></li> <li><a class="term-link" href={term_url}>{term_name}</a></li> </ul> -
Type Compte – Le code HTML généré pour un champ à valeur unique est :
<a class="user-link" href={author_url}>{display_name}</a>Pour un champ à valeur multiple :
<ul> <li><a class="user-link" href={author_url}>{display_name}</a></li> <li><a class="user-link" href={author_url}>{display_name}</a></li> </ul> -
Pour d’autres types de champ plus complexes, vous pouvez générer un code HTML personnalisé en utilisant le crochet :
apply_filters( 'meta_field_block_get_acf_field', $field_value, $post_id, $field, $raw_value, $object_type )Ou en utilisant le crochet général :
apply_filters( 'meta_field_block_get_block_content', $content, $attributes, $block, $object_id, $object_type )
Quel est le code HTML généré par les champs de Meta Box ?
-
Similaire aux champs ACF, tous les champs de base qui renvoient des chaînes ou peuvent être transtypés en chaînes en utilisant la fonction
rwmb_get_valuesont pris en charge.La sortie HTML des champs de base clonables est :
<span class="value-repeater-item">{item_1_value}</span>, <span class="value-repeater-item">{item_2_value}</span>Utilisez les crochets suivants pour modifier l’étiquette et le séparateur :
apply_filters( 'meta_field_block_mb_clone_field_item_separator', ', ', $field, $post_id, $field_value ) apply_filters( 'meta_field_block_mb_clone_field_item_tag', 'span', $field, $post_id, $field_value ) -
Types d’images uniques – Le code HTML généré provient de la fonction wp_get_attachment_image. La taille de l’image est définie par le réglage
image_size. -
Types de liste d’images (Image, Image avancée, Téléversement d’image) – La sortie HTML est :
<figure class="image-list"> <figure class="image-item"><img /></figure> <figure class="image-item"><img /></figure> </figure> -
Type case à cocher/interrupteur – Similaire au type Vrai/Faux d’ACF.
-
Types à choix multiples (Liste déroulante, Liste déroulante avancée, Groupe de boutons, Autocomplétion, Sélection d’image, Liste de cases à cocher) – La sortie HTML est :
<span class="value-item">{item_value}</span>, <span class="value-item">{item_value}</span>Pour afficher le libellé au lieu de la valeur, utilisez ce crochet :
apply_filters( 'meta_field_block_mb_field_choice_item_display_label', false, $field_name, $field, $post_id, $value )Pour modifier le séparateur, utilisez ce crochet :
apply_filters( 'meta_field_block_mb_field_choice_item_separator', ', ', $file_name, $field, $post_id, $value ) -
Type radio – La sortie est la valeur du champ par défaut. Pour afficher le libellé ou modifier le séparateur, utilisez les mêmes crochets que pour les types à choix multiples.
-
Type de publication – La sortie HTML pour un champ à valeur unique est :
<a class="post-link" href={url} rel="bookmark">{title}</a>Pour un champ à valeur multiple :
<ul> <li><a class="post-link" href={url} rel="bookmark">{title}</a></li> <li><a class="post-link" href={url} rel="bookmark">{title}</a></li> </ul> -
Taxonomie, Type avancé de taxonomie – La sortie HTML pour un champ à valeur unique est :
<a class="term-link" href={term_url}>{term_name}</a>Pour un champ à valeur multiple :
<ul> <li><a class="term-link" href={term_url}>{term_name}</a></li> <li><a class="term-link" href={term_url}>{term_name}</a></li> </ul> -
Type d’utilisateur/utilisatrice – Similaire au type d’utilisateur ACF
-
Type de vidéo – La sortie HTML pour un champ à valeur unique est :
<video controls preload="metadata" src={video_src} width={video_width} poster={poster} />Pour un champ à valeur multiple :
<figure class="video-list"> <figure class="video-item"><video /></figure> <figure class="video-item"><video /></figure> </figure> -
Pour afficher des types de champs complexes ou modifier la sortie d’un champ, utilisez le crochet
meta_field_block_get_mb_fieldou le crochet généralmeta_field_block_get_block_content.
Extraits à copier & coller
Lors de l’utilisation du crochet meta_field_block_get_block_content pour personnaliser le contenu du bloc, nous recommandons de sélectionner dynamic comme type de champ. De cette façon, à la fois l’interface publique et l’éditeur afficheront les modifications. Si vous travaillez avec des champs ACF, nous suggérons d’utiliser le crochet meta_field_block_get_acf_field pour modifier le contenu du champ. De même, les utilisateurs/utilisatrices de Meta Box devraient utiliser le crochet meta_field_block_get_mb_field pour modifier le contenu. Les extraits ACF peuvent également être utilisés avec les champs Meta Box, mais vous devez utiliser le nom de crochet correct et remplacer la fonction get_field par la fonction rwmb_get_value.
-
Comment modifier la sortie HTML du bloc ? En utilisant le crochet
meta_field_block_get_block_content:add_filter( 'meta_field_block_get_block_content', function ( $block_content, $attributes, $block, $post_id, $object_type ) { $field_name = $attributes['fieldName'] ?? ''; if ( 'your_unique_field_name' === $field_name ) { $block_content = 'new content'; } return $block_content; }, 10, 5);Utilisation du crochet
meta_field_block_get_acf_fieldpour les champs ACF uniquement :add_filter( 'meta_field_block_get_acf_field', function ( $block_content, $post_id, $field, $raw_value, $object_type ) { $field_name = $field['name'] ?? ''; if ( 'your_unique_field_name' === $field_name ) { $block_content = 'new content'; } return $block_content; }, 10, 5);Cet extrait basique est très puissant. Vous pouvez l’utiliser pour afficher n’importe quel champ provenant de publications, de termes, de comptes ou de réglages. Voir en détail les cas particuliers ci-dessous.
-
Comment envelopper le bloc avec un lien vers la publication dans la boucle de requête ? En utilisant le crochet
meta_field_block_get_block_content:add_filter( 'meta_field_block_get_block_content', function ( $block_content, $attributes, $block, $post_id ) { $field_name = $attributes['fieldName'] ?? ''; if ( 'your_unique_field_name' === $field_name && $block_content !== '' ) { $block_content = sprintf('<a href="%1$s">%2$s</a>', get_permalink($post_id), $block_content); } return $block_content; }, 10, 4);Utilisation du crochet
meta_field_block_get_acf_fieldpour les champs ACF uniquement :add_filter( 'meta_field_block_get_acf_field', function ( $block_content, $post_id, $field, $raw_value ) { $field_name = $field['name'] ?? ''; if ( 'your_unique_field_name' === $field_name && $block_content !== '' ) { $block_content = sprintf('<a href="%1$s">%2$s</a>', get_permalink($post_id), $block_content); } return $block_content; }, 10, 4);Cet extrait fonctionne uniquement avec un bloc ayant des balises HTML « inline » ou une image.
-
Comment afficher un champ d’URL d’image comme une balise d’image ? En utilisant le crochet
meta_field_block_get_block_content:add_filter( 'meta_field_block_get_block_content', function ( $block_content, $attributes, $block, $post_id ) { $field_name = $attributes['fieldName'] ?? ''; if ( 'your_image_url_field_name' === $field_name && wp_http_validate_url($block_content) ) { $block_content = sprintf('<img src="%1$s" alt="your_image_url_field_name" />', esc_attr($block_content)); } return $block_content; }, 10, 4);Utilisation du crochet
meta_field_block_get_acf_fieldpour les champs ACF uniquement :add_filter( 'meta_field_block_get_acf_field', function ( $block_content, $post_id, $field, $raw_value ) { $field_name = $field['name'] ?? ''; if ( 'your_image_url_field_name' === $field_name && wp_http_validate_url($block_content) ) { $block_content = sprintf('<img src="%1$s" alt="your_image_url_field_name" />', esc_attr($block_content)); } return $block_content; }, 10, 4); -
Comment afficher plusieurs champs méta dans un même bloc ? Par exemple, si nous avons besoin d’afficher le nom d’un utilisateur ou d’une utilisatrice à partir de deux champs méta
prénometnom.add_filter( 'meta_field_block_get_block_content', function ( $block_content, $attributes, $block, $post_id ) { $field_name = $attributes['fieldName'] ?? ''; if ( 'full_name' === $field_name ) { $first_name = get_post_meta( $post_id, 'first_name', true ); $last_name = get_post_meta( $post_id, 'last_name', true ); // If the meta fields are ACF Fields. The code will be: // $first_name = get_field( 'first_name', $post_id ); // $last_name = get_field( 'last_name', $post_id ); $block_content = trim("$first_name $last_name"); } return $block_content; }, 10, 4);Choisissez le type de champ
dynamiqueet saisissez le nom du champfull_name. -
Comment afficher un champ de réglage ? Par exemple, nous devons afficher un champ de réglage nommé
footer_creditdans l’élément de modèle de pied de page du site.add_filter( 'meta_field_block_get_block_content', function ( $block_content, $attributes, $block, $post_id ) { $field_name = $attributes['fieldName'] ?? ''; // Replace `footer_credit` with your unique name. if ( 'footer_credit' === $field_name ) { $block_content = get_option( 'footer_credit', '' ); // If the field is an ACF Field. The code will be: // $block_content = get_field( 'footer_credit', 'option' ); } return $block_content; }, 10, 4); -
Comment utiliser MFB comme texte indicatif pour afficher n’importe quel type de contenu ?
ÉCONOMISEZ VOTRE TEMPS AVEC MFB PRO
Pour afficher des champs de type de données simples pour les publications, les termes et les utilisateurs/utilisatrices, vous n’avez besoin que de la version gratuite de MFB. MFB Pro peut vous faire économiser 90% du temps de développement lorsque vous travaillez avec des champs complexes ACF. Il y parvient en transformant vos types de champs complexes ACF en blocs de conteneurs, qui fonctionnent de manière similaire aux blocs de conteneurs natifs. Cela élimine le besoin de créer des blocs personnalisés ACF ou d’écrire du code personnalisé pour afficher des champs complexes ACF. Vous trouverez ci-dessous un tutoriel vidéo sur la façon d’utiliser MFB Pro pour créer un modèle de publication sans coder.
Ci-dessous, vous trouverez quelques tutoriels vidéo qui montrent comment MFB Pro peut vous aider à afficher des champs complexes :
Comment construire un modèle de publication pour afficher des données dynamiques sans coder
Comment afficher les champs ACF répéteur sous forme de liste, de grille ou de carrousel
[YouTube https://youtu.be/a9ptshyuJLM]
Comment afficher les champs de la galerie ACF sous forme de grille, de masonry ou de carrousel
[YouTube https://youtu.be/mRWIibbcHQ8]
Les principales fonctionnalités de MFB PRO sont :
- Afficher les champs de réglages.
- Afficher les champs de mise en page avancée ACF : Groupe, Répéteur, et Contenu flexible.
- Afficher les champs du répéteur ACF dans une mise en page en carrousel, ce qui est utile pour afficher des bannières défilantes.
- Afficher les champs d’un répéteur ACF sous forme d’accordéon, ce qui est utile pour afficher des pages de FAQ.
- Afficher les champs de relation ACF et les champs d’objet de publication comme une boucle de requête.
- Afficher le champ d’image ACF comme un bloc d’image cœur.
- Affichez le champ Galerie ACF comme une galerie d’images en utilisant des mises en page en grille, masonry ou en carrousel.
- Afficher le champ de fichier ACF comme un bloc vidéo, un bloc image, un bloc bouton ou un lien.
- Affiche le champ Lien d’ACF comme un bloc natif de bouton.
- Affichez le champ d’URL ACF sous forme de bloc d’image, bloc de bouton, lien, bloc vidéo ou bloc de Contenu embarqué.
- Afficher le champ E-mail ACF comme un bloc de bouton ou un lien.
- Afficher le champ oEmbed de l’ACF comme un bloc de contenu embarqué.
- Afficher le champ « Google Map » d’ACF.
- Toutes les fonctionnalités des types de champs Meta Box correspondant aux types de champs ACF prennent en charge les mêmes fonctionnalités Pro que ACF.
- Afficher le champ de groupe de la boîte de métadonnées, similaire au champ de groupe ACF.
- Afficher le champ de groupe clonable de la méta box comme un bloc répéteur, similaire au champ Répéteur ACF. Prend en charge les mises en page en ligne, en pile, en grille ou en carrousel.
- Afficher le champ de publication de la boîte de méta comme une boucle de requête.
- Afficher le champ d’image unique de la méta box comme un bloc d’image, et le champ de liste d’images comme une galerie d’images en utilisant des mises en page en grille, masonry ou carrousel.
- Afficher le champ de saisie unique du fichier de la méta box comme un bloc vidéo, un bloc image ou un bouton.
- Afficher un champ de groupe comme un bloc de détails, et afficher un répéteur ou un groupe cloné comme un accordéon.
- Définir une seule sous-champ d’image (Image ACF ou Image Meta Box) comme image d’arrière-plan d’un champ de groupe.
- Afficher les champs personnalisés d’un article, d’un terme ou d’un⋅e utilisateur/utilisatrice spécifique.
- Afficher un champ de taxonomie comme un bloc de requête de termes.
- Afficher un champ de groupe répéteur ou cloné comme un bloc cœur/accordéon.
Depuis la version 1.5.3, MFB Pro vous permet de lier des champs personnalisés (ACF, Meta Box, champs méta du cœur et réglages du cœur) directement aux blocs du cœur (Titre, Paragraphe, Bouton, Image, vidéo et Contenu embarqué).
Pour les types de champs plus complexes (Groupe, Répéteur, Contenu flexible), vous pouvez utiliser MFB Pro pour afficher le groupe comme un conteneur. Les champs imbriqués peuvent ensuite être affichés à l’aide du Bloc de champ secondaire, comme auparavant, ou être liés directement aux blocs cœur.
Si cette extension vous est utile, veuillez s’il vous plait laisser une évaluation rapide et une note sur WordPress.org pour la faire connaître au plus grand nombre. Ce serait très apprécié.
Vous pouvez consulter mes autres extensions si cela vous intéresse :
- Constructeur de Blocs de Contenu – Cette extension transforme l’éditeur de blocs en un puissant constructeur de page en vous permettant de créer des blocs, des variations et des compositions directement dans l’éditeur de blocs sans avoir besoin d’un éditeur de code.
- Bloc SVG – Un bloc pour afficher des images SVG sous forme de blocs. Utile pour les images, icônes, séparateurs et boutons. Il vous permet de téléverser des images SVG et de les charger dans la bibliothèque d’icônes.
- Icône séparateur – Un petit bloc similaire au bloc cœur/séparateur mais avec la possibilité d’ajouter une icône.
- Bloc fil d’Ariane – Un simple …